Custom model by: kuzzzma
Difficulty / Сложность: ★★☆☆☆ (2/5)
Paper / Бумага: I prefer Matte photo paper 120gsm
Time / Время: 1 hour / час
How-to assemble: Instructions below, in English and Russian.
Links: A03 | Twitter post | Tumblr post
DON’T REPOST PDF files, please link to this post with preview only!
You can’t do Oppenheimer papertoys and not make some Barbie too..
This is my first papercraft figure of Barbie, based on first dolls produced and Margot Robbie appearance teaser trailer for Barbie (2023).
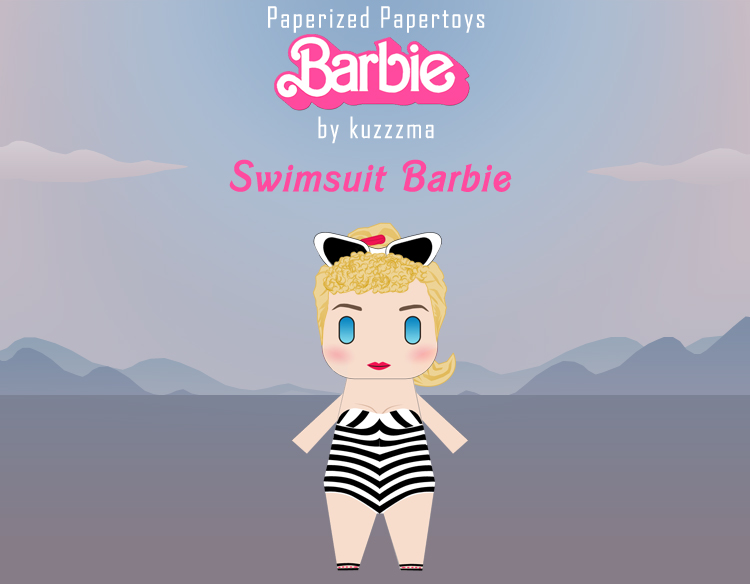
Barbie paper toy
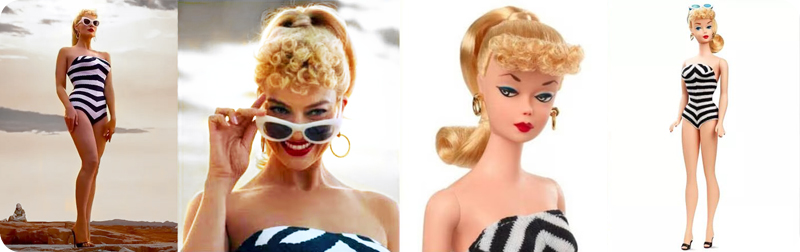 Photos used as reference for this Barbie paper toy
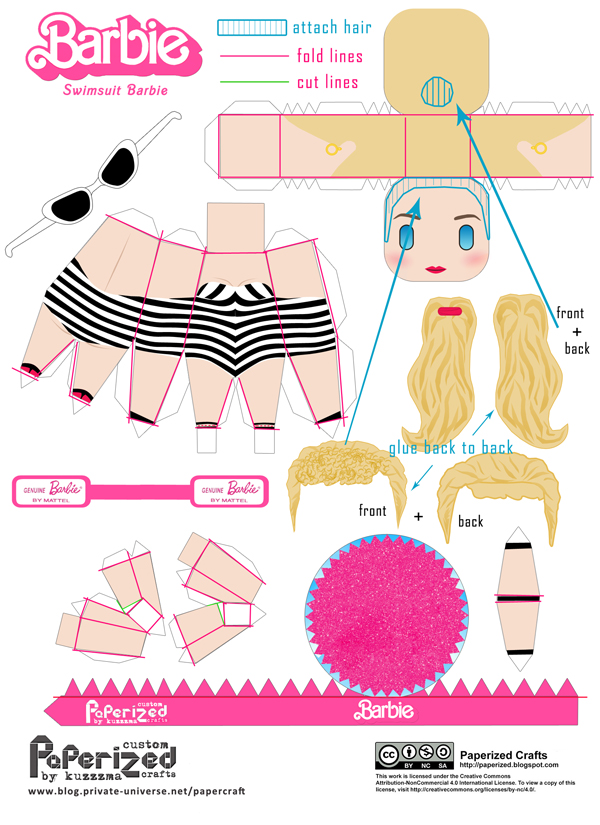
This papertoy presents Barbie in her famous striped swimsuit, cat-eye glasses, with curled fringe and ponytail, I’ve added Barbie tag too for doll aficionados (it’s meant to be attached to doll’s hand).
As simultaneous release of Barbie and Oppenheimer was such a perfect metamodern moment, I just could’t resist some Barbieheinmer…

Photos:
")
More photos can be seen in this Barbie photo album.
If you build it – please sent me a photo or give me a link in comments (or via Twitter @kuzzzma or Instagram @kuzzzma_papercraft DM).
It’s the best feedback.
Download PDF:
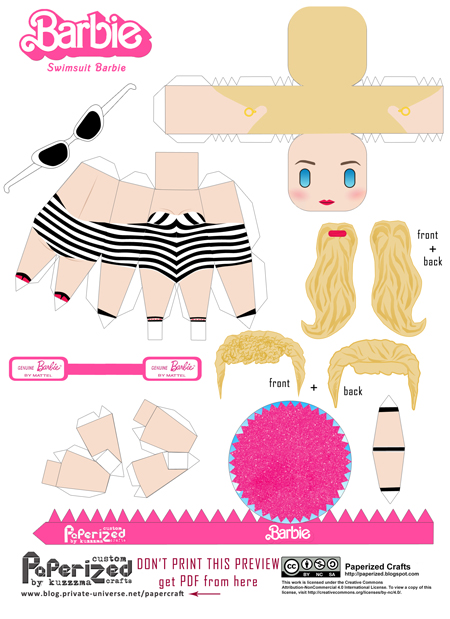 Template preview of Barbie paper toy
How-to build this papertoy
 pic.1 How-to: lines to fold
English instructions
- Print your model, using 1 page of A4 paper (can be printed on legal paper too with some scaling). I prefer matte photo-paper with thickness of 120gsm, but regular office paper works too (for the info – it’s 80gsm thickness).
-
Get a good glue. Usually PVA glue is recommended for papercraft, but in some parts of the world getting a decent PVA glue is unexpectedly tricky – a normal liquid clear glue is fine too. Glue in a stick won’t work though – details of paper toys are too small to use it. I prefer to apply glue with wooden toothpicks.
- I recommend scoring future fold lines on the uncut page (indicated on how-to pic.1) with pointed but blunt instrument (empty pen, knitting needle…)
- Cut all the details, as some details are small – you may have to use smaller scissors.
- Fold all pieces, using guide above as reference.
- Assemble head, put it aside.
- Glue front piece of hair to it’s back part. Back part is made larger intentionally, to allow some margin of error here. Cut excess paper. Put aside.
- Glue front piece of ponytail to it’s back part. Back part is made larger intentionally, to allow some margin of error here. Cut excess paper. Put aside.
- Assemble main body.
- There is an “extra body piece” that goes to close the gap between legs – it can be challenging it glue in (I use pincers to hold it in place), but it can be skipped and your figure will still look great.
- Assemble both hands (choose colour depending on preferred look), put them aside.
- Assemble figure stand.
-
TIP: If you want your paper toy to look really polished and tidy – carefully color white edges of the papertoy in corresponding colours (or in black). I also color backs of coat. Any paint or marker can be used. This instantly elevates figure and also can be used to hide any build imperfections.
- Time to put it all together. Recommended order:
- Glue body to figure stand.
- Glue in corresponding hands to the jacket. Good position for hands – 0,5cm (0.2 inch) from the neck on the sides of the body.
- Glue in head.
- Glue in piece of hair with fringe to the head. It’s designed to stand out at the top over the main head piece, the “back” part attaches to the face plate, “front” part faces the viewer. Put glue only on the top edges of the face plate (zone indicated in blue on how-to pic.1).
- Glue ponytail to the back of the head. It’s designed to stand out at the top over the main head piece? so use scrunchie as an indicator where to position this piece.
- All done!
Русская инструкция
- Распечатываем выкройку бумажной фигурки на листе A4.
Можно использовать обычную офисную бумагу (80gsm), но для лучшей сохранности я предпочитаю более плотную: матовую, толщиной от 120gsm. -
Клей: для пейперкрафта обычно советуют клей на основе ПВА, но в последнее время найти хороший ПВА клей стало сложно (они просто не клеят!). Подойдет и обычный прозрачный канцелярский. Клей в стиках не подойдет – детали слишком мелкие. Я предпочитаю наносить клей зубочисткой – удобно, аккуратно и никакой уборки после. Ей же очень удобно прижимать детали друг к другу в труднодоступных местах (внутри головы особенно).
- Намечаем линии сгиба на неразрезанном листе (см. pic 1) – это можно сделать непишушей ручкой, спицей, другим инструментом, который не порвет бумагу.
- Вырезаем все детали.
- Сгибаем детали по всем намеченным линиям.
- Склеиваем голову, откладываем. на этом этапе можно наклеить сверху дополнительное лицо.
- Приклеиваем перед волос к задней части волос. Обрезаем лишнее – деталь задника волос сознательно сделана чуть шире, чтобы дать пространство для маневра при склейке.
- Аналогично поступаем с 2мя деталями хвостика. Обрезаем лишнее – деталь задника волос сознательно сделана чуть шире, чтобы дать пространство для маневра при склейке.
- Склеиваем основное тело.
Дополнительная деталь вклеивается последней и закрывает собой дырку в тушке между ног. Вклеивать ее не очень удобно (издержки дизайна), я пользуюсь пинцетом для удержания детали. Эта деталь НЕОБЯЗАТЕЛЬНА и может не вклеиваться – внешний вид фигурки от этого сильно не пострадает. - Склеиваем нужные ручки.
- Склеиваем подставку.
-
Для более аккуратного вида рекомендую прокрасить все боковые элементы и стыки подходящим по цвету маркером/краской, это скроет белый цвет бумаги и существенно улучшит внешний вид. Если вы используете толстую бумагу – это особенно актуально!
- После того, как все элементы готовы – приступаем к финальной сборке.
- Рекомендуемый порядок сборки:
- Устанавливаем тело на подставку.
- Приклеиваем руки к телу (рекомендуемая позиция для рук – 0.5 см от шеи)
- Приклеиваем волосы к лицевой части. Волосы сверху выступают над головой, поэтому наносите клей ТОЛЬКО по краю лицевой части!
- Приклеиваем хвостик к задней части головы. Волосы сверху выступают над головой, ориентируйтесь на резинку при позиционировании.
- Приклеиваем голову к телу.
- Все готово!